Category Tuesday Photo Tip

Tuesday Photo Tip | Confetti Fun!

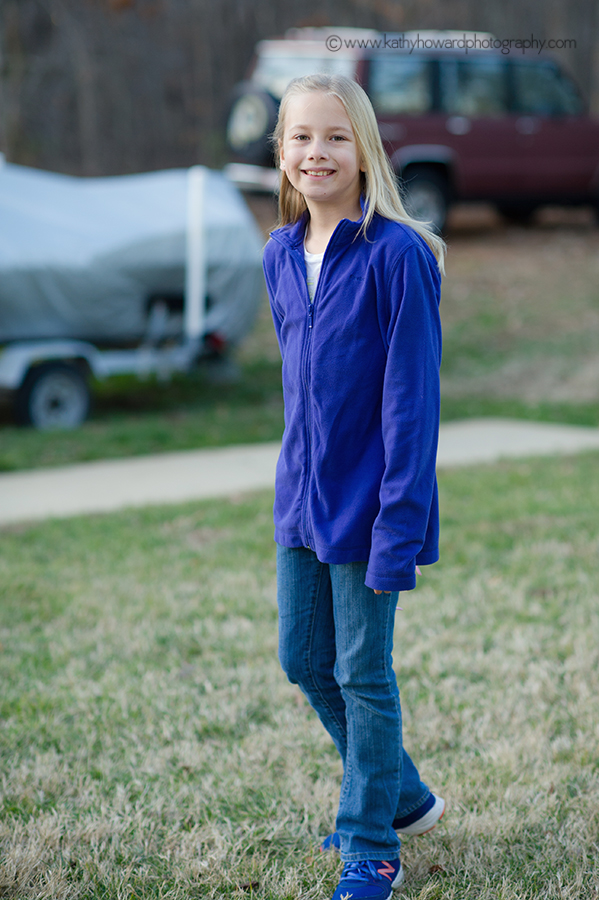
Last week was my oldest daughter’s 14th birthday.  She requested a photo shoot weekend, and of course I obliged!

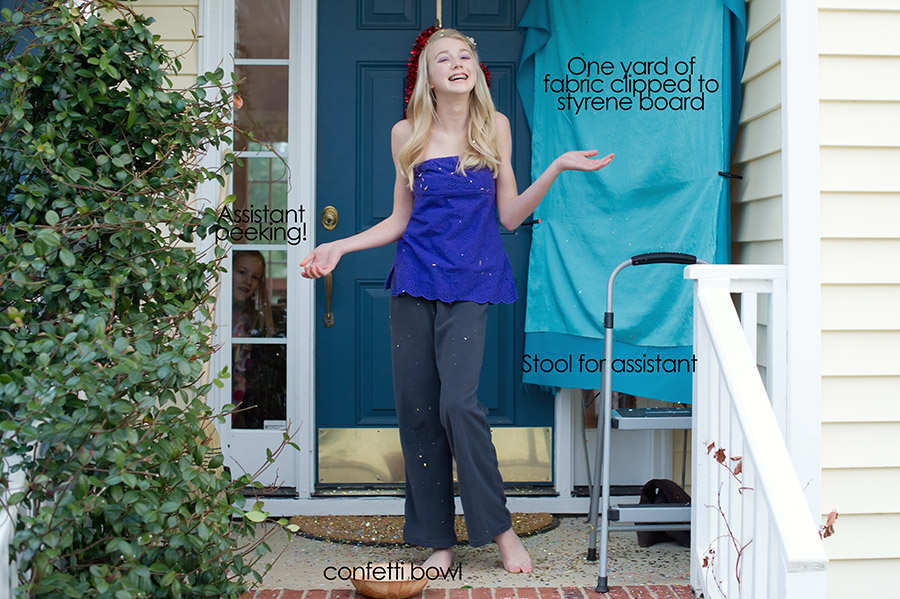
One of the fun shots she wanted was blowing confetti.  We decided to make it a fun and colorful birthday pic, so I visited the local fabric shop and picked up one yard of fabric for the backdrop.  I seriously don’t understand why people spend hundreds of dollars on backdrops, when you can spend $7 on a yard of fabric!

Next was to find confetti.  I wasn’t sure what would work best, so I purchased several different types.  Used in this photo is THIS paper confetti I purchased on Etsy.  Awesome stuff.  Second favorite that floated and sparkled beautifully was a shaker of gold confetti flakes that I purchased at Michael’s.  I cannot find the link online, but if you shop for some it looks like gold flakes in an ice cream sprinkle container.

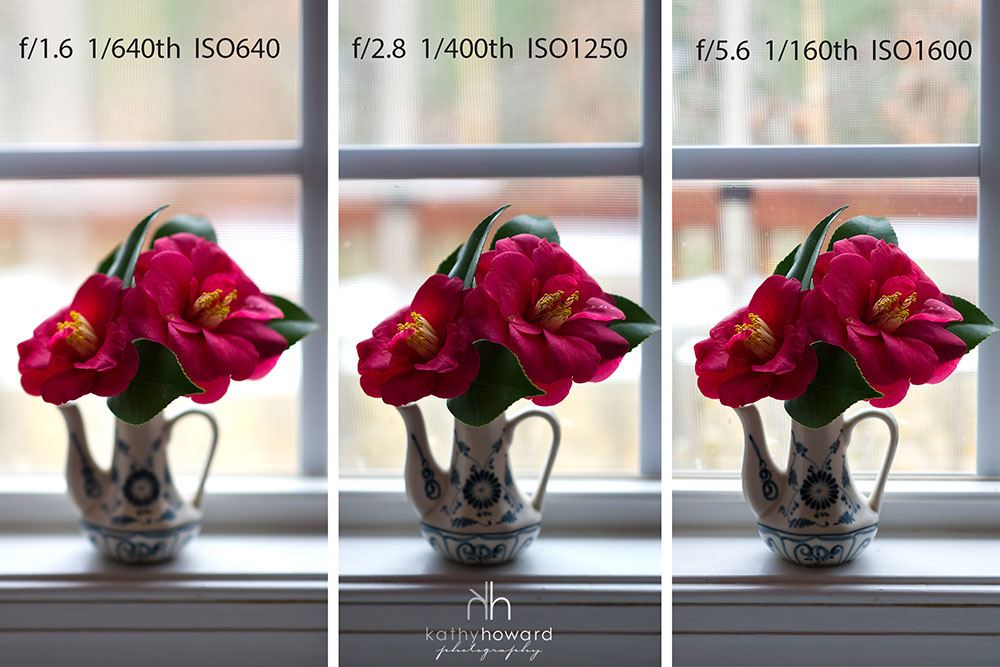
Now, for the set-up.  My favorite location – the front porch.  The perfect light.  Click HERE to see my previous “Simple Lighting Technique’ tutorials about using a covered location for beautiful lighting.

Our first two attempts I noticed she was closing her eyes when blowing.

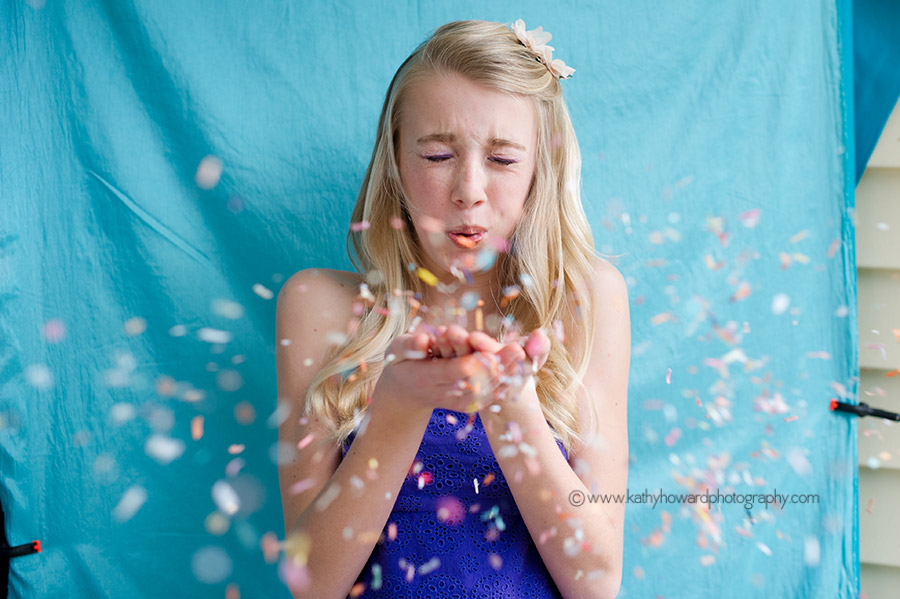
ISO 640   f/2.8   1/320th

Not really the shot either of us wanted.  We also wanted more confetti around her head.

So I got my youngest to stand on the stepping stool and drop confetti one count before she started blowing.

“Keep your eyes open” I yelled!

We got this …

She still kind of looks likes she struggling with the eyes, but it also looks happy to me so it’s a keeper!

(You don’t get too many attempts with a teenager I tell you)

I edited the photo by softening the background with radial blur, clone stamping a few confetti spots to fill in the blanks, slight brighten and contrast increase and cropped it square (it’s for her instagram afterall)

Happy 14th birthday to my sweet girl!!!

Any questions, you can leave in the comments.

Any questions for next week, please leave in comments… please?  I need some ideas lol!

Have a great day~

Kathy

Portrait Photographer Raleigh NC

Tuesday Photo Tip | How to Freeze Action

Today’s tip is all about shutter speed & how to freeze action.  A big topic, but I will do my best to keep it brief and to the point. If you have further questions feel free to leave them in the comment field and I will reply!

Thank you to my friend Kathy who asked this question.  She has a really nice Nikon DSLR camera, and two awesome girls that rock the soccer field!  Her question is : How can I take soccer action shots that are not blurry?

If you want to freeze action, you need to use a fast shutter speed.  Let’s cover some basics here and then I’ll show some examples.

.

What is shutter speed?  Shutter speed is the length of time a camera shutter is open to expose light into the camera sensor.

Shutter speed is measured in seconds – or in most cases fractions of seconds. The bigger the denominator the faster the speed (i.e. 1/800 is much faster than 1/30).

How do you change your shutter speed? If you have a DSLR,  the easiest way is to set your camera on Shutter Priority and adjust your shutter speed (more info in your camera manual).  The camera will do the rest for you.  If you have a point and shoot, rotate your dial to the runner icon!

If you want to freeze action, use a faster shutter speed  i.e. my standard 1/500th (bigger denominator) .  If you want to blur action, use a lower shutter speed i.e. 1/100th ( smaller denominator)

The brighter the time of day, the easier it is to stop motion.  More light = faster shutter speeds available.  (This is without a flash)

.

 If I want to freeze action I typically shoot at 1/500th shutter speed.  I like to really freeze the action – you can experiment and use a slower shutter speed and see what you get.  Practice practice!

.

Here are a few samples of different shutter speeds that I used for different results :

My settings here are :  shutter speed 1/500th   Aperture f/3.5  ISO 640

Keep your focus point on the subject.  Every two clicks or so I re-focus. (Let go of the button and press it again)

.

I bumped my shutter speed up a little faster for this pic, since I knew my kids would be racing each other!

shutter speed 1/800th    aperture f/7.1     ISO 320

Every two clicks I refocused.  I call it burst shooting.  Not sure what the technical term is.

.

I wanted the hair in this image to be a bit blurry & soft, so I slowed down my shutter speed.  I focused on her eyelashes and then said go!

shutter speed 1/200th    aperture f/3.2     ISO 640

.

I hope this helps!  It’s a huge topic with a lot of variables, so please know I only touched on a very few.  And please know I am not claiming to be the expert here :)   Just sharing what I know.

Leave me a comment – I’d love to hear back from you if this tutorial made sense and/or helped you understand!

~Kathy

Portrait Photographer Raleigh, NC

Tuesday Photo Tip | Bend Your Knees! (Change Your Perspective)

 This week my tip is to try changing your perspective when you take a picture.  Instead of standing in front of your subject, straight on, change it UP!

Move around your subject.  Stand above or squat low.  Try it out!  See what you get.

I quite often will shoot something from two different angles, not sure which one I will like better until I see on my computer screen.

Example A.

(Please excuse the iPhone 5 photos, but not too shabby for night shots!)

Here I am in front of NC State bell tower after a big win over Carolina this past weekend.

GO WOLFPACK!

It’s a great snap (thanks honey!) and one that I will enjoy forever.

However, notice the top of the bell tower is chopped off.  No big deal, but look at the difference in my photo of him.

I bent my knees to get lower, to include the top of the bell tower in the snap :

Example B

Doesn’t it feel more powerful & a bit awe inspiring with the clock view?

(I wished at that moment I had my big girl camera, but again, snapshots ARE important).

My challenge to you is this.  Next time you take a photo, try changing your perspective!I’d love to hear and see what you get – email me or send me a link to your Flickr or whatever you use to share your photos!

I will follow up with more tips (and better photos!) on perspective, as I really feel this is a big part of unveiling your own creativity :)

I am still looking for future tips, so PLEASE leave me a comment with something you’d like to hear about!  Please? ha ha!

Have a great day~

Kathy

To see last week’s Tuesday Tip for capturing bright eye catch lights, click HERE

Portrait Photographer Raleigh,NC

Tuesday Photo Tip | Eye Catchlights

Hello!  Today I will share one tip on how to achieve bright eye catchlights.  (There are many tips, this is just one that I use a lot)

Catchlights add life to a portrait, & can help draw attention to the subject’s eyes.

.

I pulled my youngest away from her basketball for five minutes so I could snap these sample images for you.  End of day, sun is down but still bright outside.

Image A.  Pretty face, nice breeze, but not too much sparkle in the eye :

ISO 640  f/2.5  1/800th

Here’s the pull back shot of where she was standing.  She is facing South, so the sun is setting to her right (our view, left)

.

Image B.  I had her squat and look UP at me.  Why?  The light source is UP.

Face your subject TOWARDS the light source.

Someone once told me think of the sun and the sky as a big flash.  I always remember that!

ISO 640  f/2.5   1/800th

Can you SEE the difference?  Those white spots in her iris are from the evening sky.  Her skin is more luminous.

Here’s the drop back image for this shot (except she turned her head the other way lol) :

.

So next time you are out shooting, try having your subject look towards the light source and see what you get.  Shoot shoot shoot!!

I’d love to see what you get – leave me a comment & I’ll check it out!

Please do share any tips that YOU may have in the comments, I’d love to hear and share them.

Thanks!

~Kathy

To see last week’s Tuesday Tip on achieving a soft & dreamy background, click HERE.

Portrait Photographer Raleigh,NC

Tuesday Photo Tip | Aperture & Soft Backgrounds

Hi there!

Today I will write a brief post on how to achieve a nice soft background.

Tip # 1

DSLR:

Use a wide aperture!  The lower your f-stop number, the wider your aperture.

NOTE : Be careful & be aware that the wider the aperture you use, the shallower your focal plane will be.  Meaning other objects will may be soft as well.  See the first image above.  I focused on the green leaf in the foreground.  Parts of the flower & even the vase are soft.

Point & Shoot :

Put your camera setting on portrait.  Most times this is designated by a face icon on the settings dial.

(If you want MORE of your background in focus, put it on the landscape mountain icon on the dial!)

.

Tip #2

Get close to your subject!  The closer you are, the more ‘out of focus’ your background will be.

.

Tip #3

Place your subject as far away from the background as possible.  The more distance, the softer the background will be.

.

Hope this helps!  I am could go on and on about aperture, but trying to keep this short & sweet & to the point!

Please feel free to leave feedback & any questions you may have in the comment section.

I am also accepting suggestions for next week’s tip!  Leave a comment…

Thanks!

~Kathy